Before this last year I was unsure about what a tessellation actually is. I’m a math major and did not find out that long ago. When I asked my roommates what they thought it was they had no clue. A tessellation is tiling of a plane using one or more geometric shapes with no overlaps or gaps. These tessellations must also have a pattern in them that keeps going on until we run out of space on the paper or wherever you are making one or you just want to be done. In class we were asked to make a tessellation. In this blog I am going to talk about the history of tessellations and my thought process of two tessellations I created. One was with pattern blocks and the other on isometric cube paper. I will also talk about why this is a good activity to use in your classroom.
The Sumerians used tessellations with building wall decorations around 4000 BC. These decorations were formed by patterns of clay tiles. In 1619, Johannes Kepler studied tessellations. In his book Harmonicies Mundi, he was the first to explain the hexagonal structures of honeycomb and snowflakes. In 1891 Yevgraf Fyodorov proved that every periodic tilling contains one of seventeen different groups of isometries. With Fyodorov proving this, it unofficially began the mathematical study of tessellations. The start of the tessellation era led us to tiling on walls with clay but now we have realized we can do them anytime anywhere and how beautiful they look. They have been around for thousands of years and are here to stay forever which is great for me considering I cannot wait to teach my students about tessellations.
In class I started out using pattern blocks. Giving students the option to use all different sorts of manipulates allows their mind to run free with what they are wanting to create. When pulling out the pattern blocks there were a few things I had to remember and look for. I needed to look for shapes that went together without overlapping and leaving no gaps. This really let me explore my options. Another thing I needed to keep in mind was that I needed a pattern. So I can’t just put all these random shapes together. I needed to create something cool out of the shapes then remake it over and over again creating a tessellation. Below is the tessellation I created in class.
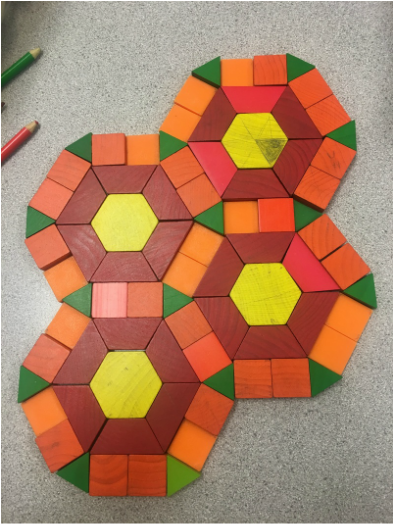
One big thing I notice when looking over the tessellation I came up with is that it is based off of hexagons. I started off with one yellow hexagon in the middle. Since I choose this to be my center shape my whole creation will be base off of that making every shapes the shape of a hexagon. Next I wanted to use red trapezoids. The trapezoids fit around the hexagon perfectly making a bigger hexagon around my centerpiece. I wanted to use one more shape to make it bigger. I really wanted to use orange squares. So I started putting squares where they fit above each trapezoid but then I noticed there were gapes in between every two squares. I had two options. One was to not use squares and try to find another shape that would not leave any gaps or I could find a shape to fill in the gaps between the squares. I choose the second option. As you can see I found a shape that fit perfectly in the space and it ended up being a triangle! Once again I noticed right away that the squares and triangles make an even bigger hexagon. Meaning this shape was all centered around the center piece I had chosen. After I found my main shape out of all my blocks I had to make it a tessellation by doing the same thing over again and connecting each big piece where they fit so its like we are translating the shape. I only did four big pieces but feel free to keep going and adding as many big pieces as you can.
I went home and for our daily homework I really wanted to create another tessellation so I did just that. I got out isometric cubed paper and started creating. What I came up with is pictured below.
I went home and for our daily homework I really wanted to create another tessellation so I did just that. I got out isometric cubed paper and started creating. What I came up with is pictured below.
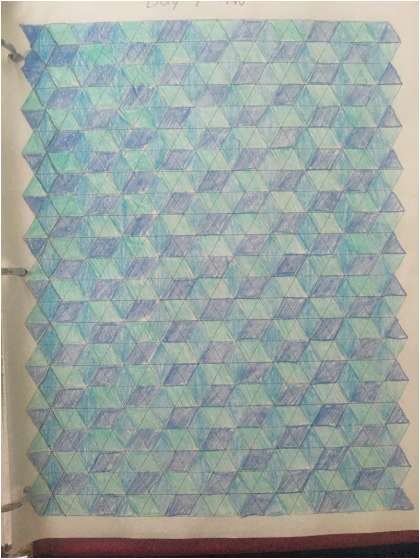
I started off with a column of just light blue rhombuses. On this isometric cubed paper it also looks like two triangles when their bases touching each other. Then in the next column I decided to use more rhombuses but they are just turned differently so that they fit along the side of the previous column of rhombuses. I alternated the colors of rhombuses in this Column. Then I did another column of light blue rhombuses. Then I decided to add one more row of the rhombuses turned differently but I alternated the colored the opposite way to give me another line of the pattern. Once I had my four steps done I then kept repeating the pattern until the paper was all used up. We can also look at this pattern another way. If you look at a point where two of the light blue rhombuses touch and look at all the other rhombuses that meet at that point we can see that we are just rotating each rhombus 60 degrees still using the same pattern of colors around that one shape. This tessellation was based on just using one shape and that’s okay to do we just have to make sure we follow a pattern. Using this isometric cubes paper we can see the triangles within the rhombuses showing us that instead of using rhombuses for every row we could have used triangles for a row or two.
This is a great activity for students. They get to integrate art within math. There are a couple of big things students get to see within doing this activity, those things being reflection, rotation, and translation. Just like with my second tessellation we found it had rotation and kids will be able to see these things after they are done without even realizing they have done so. This activity also allows students to explore different geometric shapes along with the shapes that can be made using other shapes just like in my first tessellation I had trapezoids, triangles and squares making a hexagon. This is not only a fun activity for the classroom but a very beneficial one as well. I am looking forward to working on tessellations with my students when I get a classroom of my own.
This is a great activity for students. They get to integrate art within math. There are a couple of big things students get to see within doing this activity, those things being reflection, rotation, and translation. Just like with my second tessellation we found it had rotation and kids will be able to see these things after they are done without even realizing they have done so. This activity also allows students to explore different geometric shapes along with the shapes that can be made using other shapes just like in my first tessellation I had trapezoids, triangles and squares making a hexagon. This is not only a fun activity for the classroom but a very beneficial one as well. I am looking forward to working on tessellations with my students when I get a classroom of my own.
 RSS Feed
